 This one has a lot going on that isn't real visible due to the size of the stamp I used. If you look carefully where the text ribbon is, you can just about pick out a white flower. See it? Its up under the bow. This was stamped using a shadow ink - light one on a page from an old book that I destroy more each time I need a page! The greeting was stamped in a darker ink as I found out you couldn't read it the first time! It is on vellum and attached round back of the ribbon. That is a little heart jewel that I thought just had to be there. The card is embossed and I finally got to use my vagabond!!! I am not doing anything tomorrow except cutting and embossing until I am real familiar with it. I couldn't get over how much easier it was to get things right where I wanted them. I have never embossed the whole front of a card and had it look right!!! This was first time ever on the vagabond! I want to thank all of you for the support you have given me since I started this class. I really appreciate all the enthusiasm!! Hugs to you all, (this is really all for today), Barb F
Friday, July 20, 2012
3 for today (3)
This one has a lot going on that isn't real visible due to the size of the stamp I used. If you look carefully where the text ribbon is, you can just about pick out a white flower. See it? Its up under the bow. This was stamped using a shadow ink - light one on a page from an old book that I destroy more each time I need a page! The greeting was stamped in a darker ink as I found out you couldn't read it the first time! It is on vellum and attached round back of the ribbon. That is a little heart jewel that I thought just had to be there. The card is embossed and I finally got to use my vagabond!!! I am not doing anything tomorrow except cutting and embossing until I am real familiar with it. I couldn't get over how much easier it was to get things right where I wanted them. I have never embossed the whole front of a card and had it look right!!! This was first time ever on the vagabond! I want to thank all of you for the support you have given me since I started this class. I really appreciate all the enthusiasm!! Hugs to you all, (this is really all for today), Barb F3 for today (2)
 This one is done with a kind of reverse image stamp. The black background is stamped leaving what I colored white. Then I colored the white in with colored pencils. That was the technique. I only have 3 of this kind of stamp and they are all on the smallish side. The background didn't look too black after I stamped it. I tried lots of times and finally thought, I would find a way to fix it after. I use Prismacolor colored pencils and have used them even in needlework! If you color the light colors first, then you can kind of blend them. I colored lightly over the black when I was done and then noticed that I had black pencil all over my hand!! From leaning on it, I guess. So I put a light coat of glossy accents over it and let it dry. I know the bird isn't a cardinal, but I wanted it to be red! Call it artistic license! One more post for today yet.
3 for today (1)
 This card is just such a cool technique! You use double sided sticky tape and burnish superfine glitter onto it. That gives you the white center. Well, I actually had to order both online and wait until their arrival to make the card! It was sure worth it. The glitter is called Ritz, I believe and it is transparent and as I said, superfine. The double sided tape sheets are the same material as scoretape - who knew? It would have taken me forever to cover a circle with 1/4" tape, but I could have done it. Anyhow, then you stamp and color - I used copics and archival ink that I made sure was dry. It is that swing card that we made for day 7. Onto posting the other two cards I made today.
Thursday, July 19, 2012
Day 10
This card was supposed to use border stamps. We were shown lots of things to do with clear mount border stamps. Only one problem - I only had one! All the rest of mine were red rubber and my mind wasn't working too well. I have a blind side when it comes to stars. I just love stars and once I started thinking stars, well, that was really the end of it. I did add lots of stars from my border stamp all over the place. I recently bought a Martha Stewart border punch of stars and of course I own a cricut with a bazillion cartridges and a gypsy, so I can pretty much make stuff if I need to or am so inclined. Well, I had an idea and it did take me longer than usual to put it together. I guess because this was made today before Day 9 and I wanted it to be for my service people and as such, I wanted it to be just right and for either a man or woman. And of course the stars!!
 The star dp is a recent addition to my collection of star papers! I just can't resist!. I cut those stars on my cricut and stamped different star designs on each one with that border stamp. I used distress ink. I cut out the thank you on my cuttlebug - waiting for that extra shim I need for spellbinders dies for the vagabond. The little star and the greeting are on dimensionals. I added a couple of straight lines of stars under the stars also. My thoughts were that the person who would get this was certainly a star in my mind - just had to keep it within size. A2.
 I spent a crazy amount of time getting the center stamped here. Then it dawned on me to try a different ink! So distress didn't work so well, but memento london fog was perfect. The letters on the bottom of the circle weren't real legible, so I went over them with my Pentel white gel pen. It is fabulous and so far has not let me down. I really like the way the inside came out. It says, wishing you the very best! I don't think my photography is the very best, but I use my phone as it is a whole lot easier. Hugs to you all, Barb F

 I spent a crazy amount of time getting the center stamped here. Then it dawned on me to try a different ink! So distress didn't work so well, but memento london fog was perfect. The letters on the bottom of the circle weren't real legible, so I went over them with my Pentel white gel pen. It is fabulous and so far has not let me down. I really like the way the inside came out. It says, wishing you the very best! I don't think my photography is the very best, but I use my phone as it is a whole lot easier. Hugs to you all, Barb F
Day 9
This card is supposed to be for yesterday. I had company yesterday, so I had to wait for today to make my card. In the meantime, I finally came up with a great way to use my cards! I think this idea passed through my brain a few times already, but now I have quite a stash so I can actually get started. I am going to send them to operation write home. They have a category called any hero mail. You actually write a note to the service person and hopefully it is in a card. You can also send blank cards so the service person can write home. So depending on the theme of the ones I already have made and are just sitting there, will depend on how I separate them and send them to the mailing center nearest me. I am really excited about it as you are allowed to use stickles but not glitter - That one put my participation right over the top, as most of you already know, I don't do much without stickles!!! So at least I can use the cards I have already made!!
So here is the card for day 9 - I used the same stamp set as the teachers did and just combined the techniques a bit. I thought it came out really cute. Of course, (at least so far) they don't show us what the inside of their cards look like. If I leave it blank, I don't take a photo either!!! OK - quit laughing!! I knew when I saw this stamp set that it was coming to my house and then the same thing happened when I saw this paper. Sorry - you know how poor a job I do when its figuring out which paper pack is which. So here it is! Front and inside both!

 The houses and "bushes" are white heat embossed and cut out. One of the little kites on the front is on dimensionals as are the bushes. I used my stamp positioner (that I couldn't do without) to place my greetings as they are stamped directly on the dp. I thought the greetings were just perfect for the any hero card!! I am posting two cards today again. Tomorrow is the last day of class. I will miss it for sure. Hugs to you all, Barb F
So here is the card for day 9 - I used the same stamp set as the teachers did and just combined the techniques a bit. I thought it came out really cute. Of course, (at least so far) they don't show us what the inside of their cards look like. If I leave it blank, I don't take a photo either!!! OK - quit laughing!! I knew when I saw this stamp set that it was coming to my house and then the same thing happened when I saw this paper. Sorry - you know how poor a job I do when its figuring out which paper pack is which. So here it is! Front and inside both!


Tuesday, July 17, 2012
Day 8
So today I made what I think is a really cute, masculine card. Is there such a thing? There were lots of examples for today's cards - using labels stamps. I actually cut the whole inside out of this stamp. It was some kind of camp list - not ever going to use it that way, I don't think, and besides I kept the inside so I could use it it I wanted to! I loved the card that opened where the label was (Lisa Spangler who works for Hero Arts and is one of my fav designers), but I didn't want to copy it. Then it hit me! I didn't have any stamps to say what I wanted to say, but I knew I had little letter stickers. Somewhere along the way, someone was using those cutterbee tweezers and I just had to have them! I could not have placed all those letters without them! They are like having an extra pair of hands! I used them to knot my twine also.
 There is a little piece of washi tape making a tab to open the little door. The greeting is on dimensionals and of course, no male card would be complete without a button!
 Did you guess what was inside the little door? Now don't you think its the cutest?!!!!!!! You are looking at the entire card. There is no "inside". It wasn't even hard to cut the opening since I had the stamp to guide where to cut. Thanks for your support! It means so much to me to get your feedback. At least I know I am going the right way down the path!!! Hugs to you all, Barb F
There is a little piece of washi tape making a tab to open the little door. The greeting is on dimensionals and of course, no male card would be complete without a button! Did you guess what was inside the little door? Now don't you think its the cutest?!!!!!!! You are looking at the entire card. There is no "inside". It wasn't even hard to cut the opening since I had the stamp to guide where to cut. Thanks for your support! It means so much to me to get your feedback. At least I know I am going the right way down the path!!! Hugs to you all, Barb F
Monday, July 16, 2012
Day 7 back on track


Sunday, July 15, 2012
Day 6 inside

Day 6 -bonus day

Day 5


day 4

First of 4

Tuesday, July 10, 2012
Class Day 2

One of two posts for today!!
Yep!! That's right - I finished not only that one card but another. These two have something in common. They are from the same stamp! I needed to post this so I could enter a drawing. But I have yet to even view my class. Have a million super important errands to run before I can even check out the class for today - that's the super part of doing it online. It's pretty much at your convenience, but if you want in on the prizes (this one gives prizes!), you have to stick pretty close to the dates - notice I didn't say time. So here is my take on two. The pinky one is colored in with copics (of course) and stickles (of course, again!). That greeting is from a brand new to me Hero arts stamp/die set and is heat embossed. I also punched an edge in a herringbone paper to give it some interest. The other card uses the diy stamp pad I made for the first card (yesterday) and is called offset stamping - cool, huh? I think the tiny bird adds a bit to the card and that sentiment comes from a new inchie type stamp set. I had to have it!Don't forget to look in this evening (I am on Eastern time).

These went together much quicker than the first one. Guess I was trying to do too much? Hugs to you all, Barb F

These went together much quicker than the first one. Guess I was trying to do too much? Hugs to you all, Barb F
Monday, July 9, 2012
Stretch your stamps Day 1
Well folks, I am taking another online card class called Stretch Your Stamps. These kinds of cards are very difficult for me which is why I keep taking classes! I am just fine coloring images but you know, I don't always have time and would like to get halfway proficient at this type of card. Right now they take me twice as long as coloring!! I know, what a joke! But its true. We did some incredible things today and I am in process of making more cards, I only finished one and need to post it so I can be eligible for prizes!!!! This one was done with a rainbow type of stamp pad made from Tim Holtz's cut and dry foam. I don't have many background stamps so I just used this one and kept stamping until it ran out of ink (I only inked it one time). I am looking at it and you really can't see the shadow stamping. Oh well.


I loved the way the stamping came out but was at a loss what to do with it. Made that felt rose from TH's pinecone die when my daughter was visiting and figured it would fit nicely. The tiny flowers are raised stickers that I have had forever so I decided to use them. I kept thinking Easter and it kind of does look like an Easter card! That's the main reason you don't see a greeting - if its still here next Easter, its going to find a home away from mine!! Hope you like it. The other one is in process - I am waiting for the stickles to dry so I can put it together. It is a really unique take on what to do with a background stamp. Hugs to you all, Barb F
Thursday, July 5, 2012
1st July birthday
Now, you know, I have lots of kids/grandkids, etc and July is a three birthday card month. This is the first one. I have this paper pack that is 12 x 12 and I just adore it - one of those I tore apart when I got it way back when. It is lots of butterflies and just so pretty. I haven't been able to make myself use it until now! The paper is just too pretty so I decided to really showcase it and picked out my favorite two sheets. The one I liked best is the one that I fussy cut and laid raised in front of Tilda - yep, if its going to be my fav paper, its going to be my fav Tilda!! Now if you are actually reading this, you already know which Tilda this is and if you don't - well, here's the photo

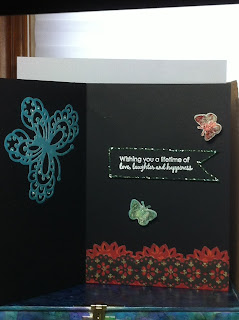

Happy Birthday is white heat embossed. I used an edge punch on the red paper which had butterfly stuff that I just couldn't use. I don't usually use black cardstock either, but it just was perfect for this card. The only stickles on this whole card are on the little cut out butterflies. I put gems on the bodies of the fussy cut butterflies on the front of the card and also on Tilda's bow. I was going to spray Tilda's background but decided I liked it white. So I just edged it with distress. The copics I used are: E21, E18, E33, E35, E00, E11, BG72, BG09, G82, G21, R17, R14, R11, Y15, Y17, C0, C2.

This is the entire inside of the card. I cut a black dp with a double sided Martha Stewart punch and glued it over the red edge punched piece that I also used on the front. The greeting is raised on a flag kind of piece and white heat embossed. I stickled the edges so it would be noticeable that it is raised. The little butterflies are from a Hero arts set that has stamps and dies that coordinate together. I have been really checking out my cricut lately and find that I could do pretty much the same things on it . I accidentally found out something grand! I was making a scrapbook page for the two babies we added to the family in April and May and the paper I wanted to cut kept coming up off my mat. I really didn't feel like cleaning the mat and I really didn't want to bust a new one out for one little embellishment either, so I just grabbed one of those temporary adhesive tape runners. Worked like a charm and the "glue" easily rubbed off the back of the paper. You know how sometimes when you pull paper up from the mat, it curls? Well, this pulled up so easily and it did really hold it down as it was a pretty fancy cut. I plan on using that method again - will let you know if anything different results! Right now I am thrilled.
I am going to have some different things coming up besides birthday cards. My grandson is getting married in August and I want to make them an album for snapshots taken at the wedding. And I am in another tag swap - actually it is really not . Ok, you make 12 tags and send them in and this wonderful gal is putting them together into a picture- one for each person in the group. Its the yahoo group All Things Tim. I am really in love with this group. Wish I could mix up my Tilda into the group, but I am not quite sure. Now that's what I need - a steampunk Tilda and Edwin!! Hmm.. I will have to think about this one. Wish I could draw! Hope you like my card. Lots of hugs go to all of you!! Barb F
Subscribe to:
Posts (Atom)

