Saturday, April 23, 2011

Please vote for me!! #85

Magnolia-licious Easter-Spring Extravaganza Contest
I am #85 and here is my entry:
This is category 1. It is the only thing I entered! The blog is found at  http://magnolia-licioushighlites.blogspot.com/. There are lots of awesome creations!!
Voting starts immediately and runs thru April 28th
Email   sjdean0574@yahoo.com (only this email address please) with your favorite choice (hopefully mine!)
*DT members on any of the Magnolia-licious DT's MAY NOT VOTE!
Hugs to you all, Barb F

Wednesday, April 20, 2011

Cupcakes

Thought I had better post this before I get swamped again. This weekend will be a busy one but not with my kids - with DH kids. Made this one for one of my granddaughters who will be 5 very soon. I sure miss her! I am thinking she will adore this one since what kid doesn't love cupcakes? I found this very pretty paper - bright and glittery! Just what a 5 yr old would adore! Perfect for this one. She is a digital stamp. Got interrupted while I was trying to figure out where I got the stamp. Forgot! So sorry. Stay tuned for an update to tell you where. Just looked it up - Mo's Digital Pencil !!! I do know the name of the stamp is "Sugar". It was a must have! I sized it pretty huge as I found out by how long it took to color! The circle I cut of the white background is 5" and the red behind it is 5 1/4". I used the Martha Stewart circle cutter (I am not real proficient with it, but at least its close to a circle!). I stickled the edges to help mask that fact - I am very good with stickles! Like I said, I wish I had stock in that company!. I don't usually do anything worth showing on the inside but I had to cover the ribbon, so I paper pieced on the left side and used a Gina K stamp on the right. It was looking a little plain - the right side, so I stickled it to death!!! There is yellow, orange, red, hot pink, lime and pink!! Told you I was good with them!  So here are the copics I used to color Sugar with:E00, E11, E21, E25, E29, R20, R000, R59, R32, R35, R37, RV34, RV95, YG03, Y15, Y17, Y21, YR20, YR07, YR04, YR23, C1. Found a lettering course online for fancy stuff and hopefully will get going with that and have some neat stuff on the next card!!  It may be a little bit before I post again. So Happy Easter, Happy Passover and Happy every holiday you might have going on now!! Hugs to you all, Barb F


Tuesday, April 19, 2011

First ATC cards

These are the very first ATC cards I ever made - or saw for that matter! I am hoping I chose the right materials. They are for a swap (which I don't usually do, but thought this would be fun). I am thinking, I will do this again!! I tried that Shrinky film and had a blast! That is the tulip part. Ended up coloring the background with Spica pens  before I shrunk it. Used my heat tool which I am now referring to as my blow torch!! You sure have to hang onto those little things! They fly all over the place! Then I decided that they were just too cute, so I had to try them with Tildas!! Of course my swap is "Flower of the month April-tulips, so I used Tilda holding tulips! I found out with the first one that it doesn't matter much if you shade stuff or not, so I only shaded the yellow one - it was first! What a blast!! Then I had to figure out what to do with  my little "charms"! I hated to stick them on anything, but I did. The background is a super fun technique where you stamp something and then emboss another image over it. I thought it still looked plain, so of course I stickled the tulip stamp!! Wish I had stock in that company!! The background is a french language stamp and of course I don't know what any of it says!! These were just so much fun to make. I asked the gal hosting the swap what she did with hers and she has an album. Think I will try to get them from all over the world!! Now that sounds like a winner!! Especially when you guys are from all over the world!! I could make each of you one and you could make me one, etc! Better stick to the groups though for now! There is a nice atc group I just joined on Yahoo groups. So here they are (finally)!! TADA!!
Add caption


Wish I could figure out how to place these photos so they wouldn't take up so mucu room! Sorry! Hugs to you all - Barb F

Monday, April 18, 2011

Requested info

The bear digi is from Meljens Designs. Cat with a flower was a freebe when I got it from Motivet. Gifts is from Elizabeth Dulemba at http://www.dulemba.com/ - not sure if it was free. This info was requested by a couple of you. Sorry I didn't take the time to find out before I posted them. I got them either from the image or the name of the file. Also I have been using the youtube videos to learn how to do all the stuff I actually do. Right now I am off to learn how to do more with the digis. Have a wonderful day! I am!!! Hugs to you all, Barb F   a little ps - I have a super mag card drying right now!!! Lots of glitz!!

Sunday, April 17, 2011

3 for the price of 1

I made three cards this morning and then proceeded to get some more coloring done! My goodness but I am in a productive phase! Good thing as I have a bazillion cards I need for May!! Don't know how soon I will be able to post to my groups, but if you are following me, you will get to see these pretty quick! I tried to name this post something distinctive so you won't have to be coming and going to see the same thing!! First one is a birthday card for a quilter which is why the colors are muted. These are two digital images, both of which were free - sorry I don't remember where. Its done on some of that new Stella and Rose DP.  Hope you like it! It went together so easily - I think the secret is picking out the dp before you color. Then everything matches.
Here are the copics: YR20, YR23, BG72, G29,
E47, C2. The brown dp is just that - not kraft. All the roses are from Wild Orchid.
So here is a new Tilda from the butterfly dreams! She is my absolute new favorite! She is sitting on a kitchen cabinet that I got from Magnolia-icious quite awhile back. I found that I could mask the top part of it off and its much more useable. It is not the easiest thing to color either. But I have the stamp and wanted to find a way to use it. I do like the way it came out and realized that it wasn't quite as hard as I thought. It does take some thought before you color. I have "grounded" all the images I used on all 3 cards. You might not see this one as easily, but its there.
I made that butterfly before I started coloring Tildas! I used to make all of my embellishments as it was so much fun!. Here are the copics I used on this card: E00, E11, E15, E18, E29, R20, RV10, RV13, RV14, V12, V15, V17,V000, C0, C3, B000, B12, B14. Last sale at Michael's, I bought a bunch of satin ribbon 5/8" wide as I decided that I like the bows a bit wider than the ribbon I already had. Hope you like this one! You will have to let me know if you like one card better than the rest! And now I have saved the cutest one for last! This is a digital image also. The proceeds are going to a relief fund for Japan. Much as I would have helped out anyhow, I just had to have this image! I am going to try to get a kabuki type face the next time I color it - you know with the white face? Hope that is what it is called. I just thought how darned cute that would be - I am trying to figure out how to do that without just leaving the paper white - that doesn't have the effect I want. This one is another birthday. The nice thing about the digital is that you can include whatever you want it to say at the same time you print the image.
Isn't she just the cutest?? Here are the copics I used: C1, C2, E31, E33, E35, E37, E49, E77, Y02, YR31, R20, R22, YG03, YG06. I stickled her little fan, the outside of the umbrella and her shoes! That is shabby shutters distress ink around the spellbinders cutout. Now wouldn't she be the cutest with a little white face? How is the thing!! Maybe a very light gray for shadow would give the effect.  That's it for today. Will post these to the groups when I can. Hugs to you all, and thanks for all the nice compliments!!, Barb F


Saturday, April 16, 2011

Just a quickie

I colored most of this afternoon so be on the lookout for some new stuff this week! Hugs to you all, Barb F

Monday, April 11, 2011

a digital image

Now this is a fairly new thing for me. It is my great grandson's birthday and somehow I didn't have exactly what I wanted to make him a card. So I got online and checked out the digis. We bought a new printer and it works wonderfully well with my copics on Staples cardstock! The image is from Mo's Digital Pencil - she has such cute things! But then so do a lot of sites. The really nice thing about digitals is the storage - they stay on the computer or a jump drive!! I am just beginning to get the hang of moving them around and really not into - yet- making scenes. But I found a whole lot of images that I purchased for cards looming in my future!! I put a whole lot of them on one sheet of cardstock and printed them with the file names above the images. That will go into my book so that when I am looking for just the right thing, I will have them to chose from as well as the other stamps I own. Well, I just love the way this card came out!! The stamp is called superduper boy. Soo cute and reminded me of our guy who is 3. Hope you enjoy it! I really appreciate you letting me know how you like the cards I post. Extra hugs for looking!!
 
Here are the copics I used: R37, R35, R32, Y31, Y35, E33, Y21, Y11, B12, B14, B91, E00, E11, C5, C2. I put red gems in the corners and glued them extra so they won't pull off. Cut the papers out with spellbinders dies. That blue paper is white cardstock colored with Tim Holtz' broken china distress ink. The next nice thing about this being a digi was that I typed in the Happy birthday Kai (short form of his name) and got to chose the font, color and size!! I had such fun making this one. I just love it!! Hope he will too. Hugs to you all, Barb F

Sunday, April 10, 2011

Bunnies everywhere!

Believe it or not, this is the last card I made this past Monday! This is also the first chance I have had to post. I do not own this Tilda either. When I first began copics - little over a year ago, (I know, it doesn't seem that it could have only been a year!) I signed up for lots of swaps. Then I ended up with lots of stuff I didn't know what to do with!! I didn't make Easter cards last year. I intend to do so this year, which is why I colored so many images that were the result of a swap! All Tildas and Edwins are absolutely adorable to me!! I had this cute bunny paper that I absolutely destroyed trying to make a frame or something for my image - you know, one of those brain dead days! So to salvage part of it, I cut some bunnies out! Desperate, I was, to use that paper one way or another! Then they looked so plain that out came the stickles and some brads to fancy them up a bit. I made a whole lot of bunnies in a couple of different sizes - I just couldn't get anymore on the card!! Of course there had to be room for ribbon and flowers!! So here are the copics I used: E00, E11, E33, E35, E37, R20, BV02, RV000, RV02, RV04, RV06.


I am a huge believer that if you want to do something - anything- you can. You just have to keep trying until you figure it out. Sometimes you learn quickly, other times, it takes almost blood to learn! And then there is the element of practice. If you are doing something wrong, all the practice in the world won't get it for you. Books, videos, classes, friends, lots of questions. Those are the secrets to success. I misunderstood the reason for the certification classes when I signed up. Then when I got into the class, I was sooo excited!! There were people of all degrees of competentcy in that copic class, so I didn't feel too out of place. I did learn what I had been doing wrong and also some things, a lot of things, that I didn't even know about. After that class is when I began to really make strides! I have lots to learn yet, but at least I am not making sooo many mistakes and can use most of what I color. I hope this is helpful to the newbies reading this. Everyone is new at sometime!! Hugs to you all, Barb F

Wednesday, April 6, 2011

Lamb card

Told you I was on a roll making cards - just at a loss of time to post them! So I have a few minutes this morning and decided to post another card - hopefully for your enjoyment! Someone sent me this image ages back when one of my groups did an image swap. Quite a nice idea, except for the difference in the cardstocks. I was so much more inexperienced with copics and got to say, most of what I colored I never finished because I didn't like the way they were coming out. I did keep them for comparisons though. This one was very recently colored though. I can do that now - go from one paper to another. I know, good for me!! Pat on the back!! Ok so here is the card!


Don't you just love that sheep paper? The flowers are from a huge pack that had all sizes, plain and glittered and I found it on clearance somewhere! The brads are all pink stones (probably plastic) but I liked the combo. Here are the copics I used:C5, C7, C1, C3, E00, E11, R20, RV000, RV02, RV04, BV02. Took out my bow easy to make the bow. It is such a nice little thing especially when the ribbon you are using is hard to handle. I accidentally found out - I made several different bows before I decided to use this one - that the one sided ribbon comes out perfectly with the bow easy!! Lots of places sell them now. Are you sitting down? I did NOT use any stickles on this card!!! Hugs to you all, Barb F

Monday, April 4, 2011

Party

Well, it was a very productive day but I'm only posting one at a time! This card is made from a cute Edwin and a cute Tilda - are there any other kind? I thought they made a cute couple!! Hope you like Tilda's couch! I couldn't find anything for her to sit on so I tried to draw a couch. Found that it looked more like a couch with the criss-crosses. Used stickles (of course) for the fizzies on the drinks. Thought it was a cute touch!! Think I'm overusing "cute"?


 Those are Magnolia flowers, in case you didn't recognize them. I used one of those corner punches to make the frame around Tilda and Edwin. I just love Edwin and hope I did him justice. Of course I love Tilda also! Here are the copics I used: C1, C3, C5, C7, E00, E11, R20, BG15, BG01, BG10, E53, E57, Y28, Y11, YR23. I am doing much better keeping track of the copics since I began using the post-it notes to write them on. I just stick the note to the back of the colored image until I actually make the card and post it on my blog. They must use some wonderful glue as somehow it stays put! Hugs to you all!! Barb F

Saturday, April 2, 2011

Surprise!

Made two cards last night and decided to post them both! Don't have time right now to do all the groups so I made the title easy to remember. I have been coloring right along, just haven't had time to make the cards. These two went together very easily- once in awhile that happens! But first - here is the setup I use to take photos - It is a color catcher made from brown cardboard. I colored a cheapo box from Michael's with Tim Holtz alcohol inks and perfect pearls. The card will sit on this to give me the height I need to take the photo. If you look, you will see a shadow - that shows that my light is coming from my left side - I am right handed and hold the camera with my left and do the controls with my right - so the light is out of my way. I aim it up above the whole set up so I don't get the direct light. I have an overhead light in that room and also try to take photos during the day. These are kind of on the light side but that is because of the glitter. You have to chose sometimes!  So this first photo is the setup, the second is not to show you the card, but show you the shadows from the light on the card.
Now to show you my "Touring Tilda! See the final background paper? It is supposed to be a map kind of thing and I thought how perfect! Used the spellbinder's dies for the cutouts. This is a Tilda that I colored awhile back and recolored with the lastest shadows and hair techniques I have learned. Amazing enough the only stickles on the image are the flower centers! I didn't realize you could go back and recolor things until I tried it - it does work pretty good! You do have to watch how the ink accumulates on your paper - each kind is different.


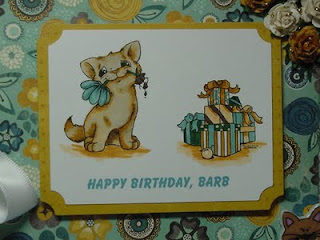
Copics I used were: E00, E11, R20, Y21, Y28, YR23, G000, G02, G05, G07, YG06, YG67, Y15, Y17, Y11, C1, C3, C5, C7, E33, E37, B02. Lots of stickles on this card, so what else is new?
 This next card is an image I have colored a lot - you would think it would be perfect by now. I just think its so cute and a real challenge. I love the girl's hair. Hope you like it, too!

The card is laying down so you can see the edge.  There is a red piece of cardstock on the inside of the card to showcase the edge. I cut it from some designer cardstock. Then I added another piece with the glitter between as the edge was purple and I didn't want that color on the card. Next photo shows this laying on a white background. I just wanted to show the border and couldn't decide which photo, so you got both!
Here are the copics I used: B23, B24, B28, B00, B05, E00, E11, E31, E33, E35, E37, R20, R17, Y21, Y28, YR23, YR20, G00, G02, G05, G21, G28. I can see now that I could have added some much darker color for the hair shadow. That would have made the hair much more realistic and shiny looking. I don't think it would be a good idea to recolor it now that it is on a card. If anyone has done that and was successful, please let me know.
Hopefully I will get to make a bunch more cards while I am in the mood! Have a nice weekend! Hugs to you all, Barb F